Getting Started with Breakout Rooms
Whether you’re new to the idea of using breakout rooms, or you’ve been using them for a while and are looking for new ways to shake things up, these tips and suggestions can help.
Consider allowing automatic updates to your Zoom app, so that you are always up-to-date.
This post covers technical and instructional supports on:
- What is a breakout room?
- How can using breakout rooms support learning?
- Before creating breakout rooms
- Creating automatically and randomly assigned rooms
- Recreating randomly assigned rooms
- Allowing learners to choose their room
- Pre-assigning rooms
It also covers instructional strategies supporting the use of breakout rooms, such as:
- Joining breakout rooms
- Sharing your screen into breakout rooms
- Broadcasting voice or text messages into breakout rooms
What is a Breakout Room?
A breakout room is a private discussion and screen sharing space within a larger synchronous online meeting. These are typically used in support of smaller group-based learning. Breakout rooms work differently whether you’re in Zoom or Teams.
If this is your first time looking into using breakout rooms, visit:
- IT’s support page on Zoom; or
- IT’s support page on O365 apps, where you can find more information about Teams.
How can using Breakout Rooms Support Learning?
The ways in which we engage in collaborative learning are increasingly diverse. Synchronous online meetings are a core element of collaborative activities, and offer the chance to give “face to face” interaction to the online learning experience (Sobko, Unadkat, Adams, & Hull, 2020). Time in breakout rooms can be complemented by asynchronous options for participatingactivities, which helps to make sure everyone can contribute when and how they are able.
Be careful in how you prepare students to participate in breakout rooms. Some research suggests that students can get a bit lost or might need help with what to expect when joining or choosing a breakout room (Fitchen et al., 2021). Carefully scaffold learners’ participation in breakout rooms into your instruction.
Before Creating Breakout Rooms
Prepare learners for the activity you’re going to ask them to do. Make sure you clearly explain to students:
- the process by which they will join the room;
- how they can ask for help;
- the expectations for their activity in the room.
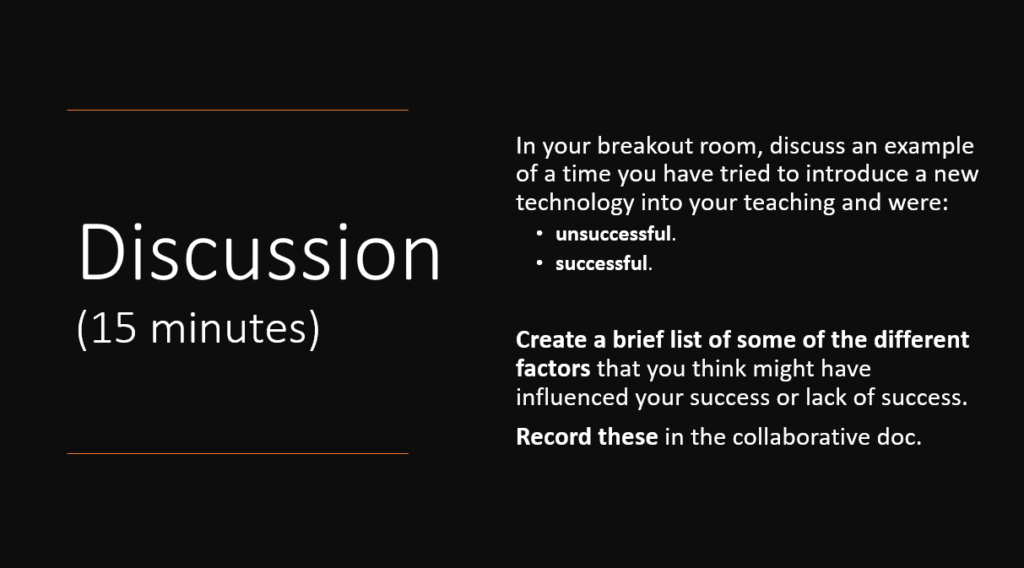
For example, you might use a presentation slide to illustrate the process by which learners will be invited into a room. Consider adding one of our example slides below in your own presentations, or adapting it to suit your need. For extra help, direct learners to the Library’s Tech Tutors.
You might also carefully construct a slide to introduce an activity. In the slide:
- Be clear and concise in your wording;
- Emphasize activity deliverables;
- Set clear time limits;
- Where possible, use collaborative docs structured as handouts to guide activity and discussion.
Creating Automatically and Randomly Assigned Rooms
Choose to assign rooms automatically when you’d like students to be randomly assigned. This is the most efficient way to create breakout rooms, and lets learners meet a variety of peers, helping to build their social presence.

Try setting up automatic breakout rooms, and also pre-setting time limits on the rooms. This gives learners a timer in the room, so they know what to expect. This also allows the rooms to close automatically, saving you a step or two.
In a subsequent activity, you can choose to keep the same breakout rooms, or choose to Recreate breakout rooms. This keeps the same number of groups, but changes up who is in each room.
Automatic assignment is probably the most frequently used breakout room set up for most active learning activities. Some favourites using this approach are:
Recreating Randomly Assigned Rooms

Perhaps you’re running a get-to-know each other activity, or having students show each other examples, and you’d like them to connect with another person or group. Once you’ve already created breakout rooms, choose to use the Recreate option to automatically switch students to new breakout rooms. This will keep the same number of rooms, but randomize the participants in each.
If you’re choosing to recreate rooms, be careful to explain the rationale for the change to the learners. Some may have formed connections with peers, or experience anxiety when meeting new people. Prepare learners that the activity will have them mixing and mingling and be prepared to support the ways learners choose to engage.
Recreating rooms is best used sparingly. It can be most effective when learners are still getting to know each other, and in contexts where varied perspectives and inputs will add value to their learning. Try it out in ice breaker activities where you’d like participants to connect, and recreate no more than once or twice. Be mindful that you use a suitably slower pace and guiding visuals, such as presentation slides with instructions.
You might use the recreate option in activities like:
Allowing Learners to Choose their Room
Using choice-based assignments might be best for learners who already feel comfortable with breakout rooms and using Zoom. You might want to allow students to select their own breakout room in some activities. This supports the choice of topics and learner autonomy. As of publication, this feature is not yet available in Teams.
To allow learners to choose their breakout room in Zoom, you can create new breakout rooms set up for this purpose or enable the feature on existing rooms.
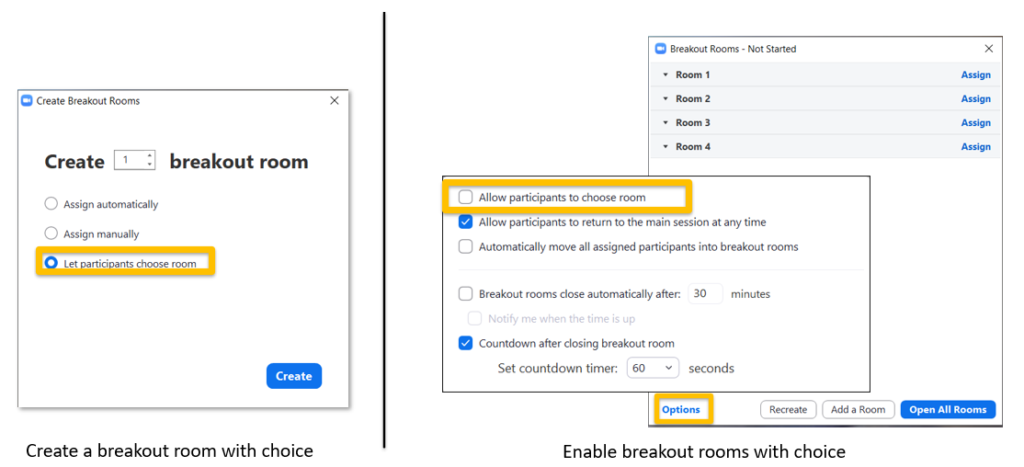
Choice can be best used in active learning activities like:
- Concept Mapping
- Jigsaw
- Participatory Discussions
- any activity where the intention is sharing and community-building.
Consider using choice-based breakout rooms during breaks, to give students a chance to chat with each other.
Pre-Assigning Rooms
You might want to use the same breakout groups over an extended period of time. This is often best used in learning activities like:
- case studies;
- courses using the PBL approach;
- courses where learners collaborate on projects throughout a semester.
Begin by creating the groups. This could be done in many different ways: e.g. pull a class email list from the Employee Portal, or ask students to sign up for their group in a simple Excel file with a few columns – the topic, their name, and their email. Then, download the Breakout Room Pre-Assignment file.
Next, copy over the email addresses into the appropriate rooms in the Breakout Room Pre-Assignment file. You can rename the rooms. Then, upload this into your Zoom meeting. Watch our video to learn how.
Joining Breakout Rooms
You may want to join the breakout rooms to monitor and supervise students as they engage in breakout room activities. You can efficiently do this in the Breakout Room window, once the rooms are open.
If you plan to join rooms in order to support and guide learners, consider some of the following:
- Inform the learners you’ll be visiting their rooms, as this will let them know what to expect. You’re there to help, first and foremost.
- Your appearance will be sudden, and this can derail conversation, so consider how you can make your appearance welcome to learners.
- Remind learners they can call you in for help. Clarify how you will respond if you are already helping someone else.
- Think carefully about which groups may be in more direct need of support, and join them first. Especially when using pre-assigned groups, following the room list may lead to Room 1 getting more quality time with you, while other groups have less.
- Consider using shared collaborative docs as handouts, so that you can monitor breakout room activities unobtrusively. This frees you up to intervene where directly required.
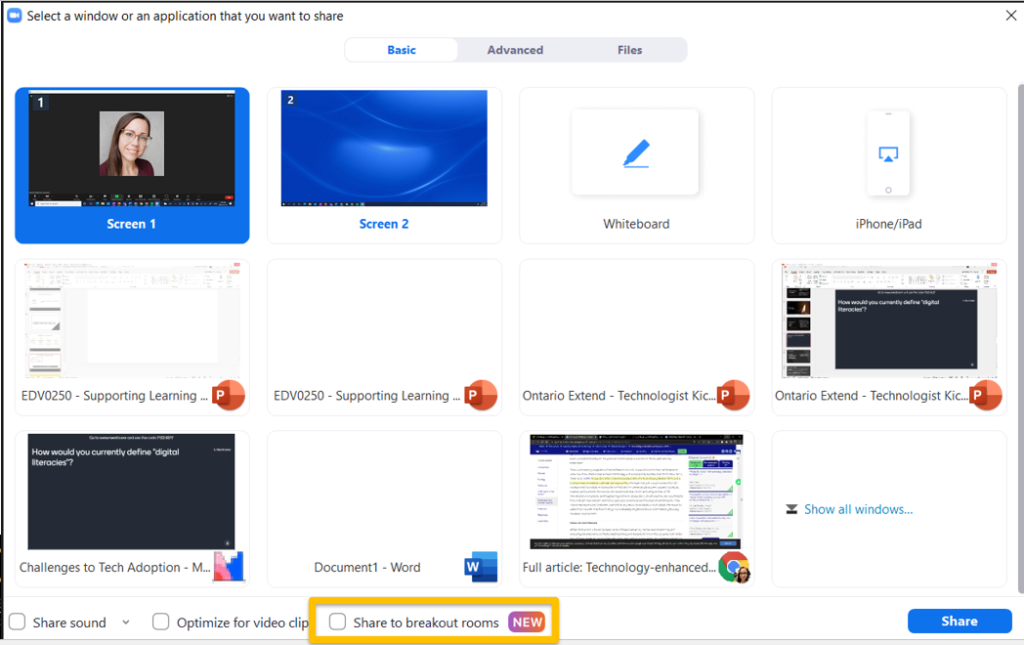
Sharing your Screen in Breakout Rooms
To further support learners in staying on task in breakout activities, share your screen into the breakout rooms once the rooms have been opened. This option only appears in your Share Screen menu once breakout rooms have been opened.
Broadcasting Voice or Text Messages
You can also broadcast text or voice into the rooms. This can provide them with reminders and tips once rooms are already started.
Once rooms are open, press and hold the B button on your keyboard to do a voice broadcast. When you start a voice broadcast, an icon will indicate the audio is transmitting. Only the meeting host can broadcast a message. Ask students to pause their conversation, then announce your message. Learn more about broadcasting audio in Zoom.
Alternatively, you can or use the Broadcast option in the Breakout Room window to send a text message.
Supporting Learners
The Library’s Teach Me Tech services offer students one-to-one support and workshops on the different technologies used in their courses. The Digital Skills Toolkit offers tutorials which can be added to your course to help them with any technology you’re using in your course.
References
Fichten, C., Havel, A., Wileman, S., Jorgensen, M., Arcuri, R. Vo, C. & Ruffolo, O. (2021). Digital tools faculty expect students to use during the COVID-19 Pandemic in 2021: Problems and Solutions for Future Hybrid and Blended Courses. Journal of Education and Training Studies. https://doi.org/10.11114/jets.v9i8.5310
Sobko S, Unadkat D, Adams J, Hull G. (2020). Learning through collaboration: A networked approach to online pedagogy. E-Learning and Digital Media 17(1). 36-55.






4 Responses