By Dr. Ada Sharpe, Dr. David Baidoo-Anu, and Dr. Monsurat Raji.
Defining scaffolding
In education, “scaffolding” refers to the use of assessments and instructional strategies to progressively build students’ capacity in completing a task. A scaffolded approach provides structure to increase the complexity of learning tasks over time while reducing the amount of support provided to the learner. Such an approach complements processes of human cognition by working with what the learner already knows to incrementally increase the complexity of learning tasks and build learner autonomy.
Importantly, scaffolding does not mean creating multiple assessment tasks to monitor attendance, participation, or completion of course materials. Instead, scaffolding supports students by breaking down multifaceted learning tasks into sequential and related components of increasing complexity.
Features
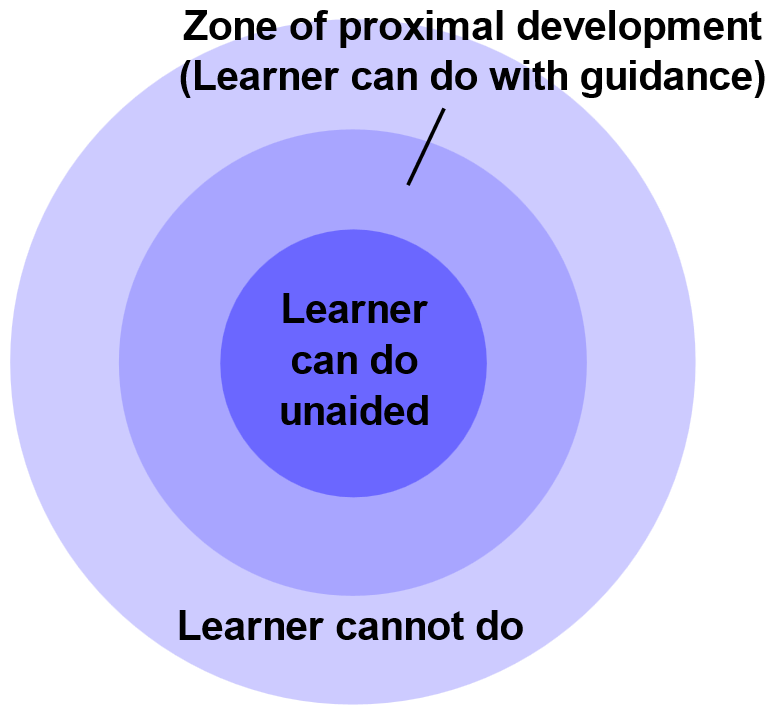
Scaffolding has theoretical foundations in Lev Vygotsky’s influential concept of the Zone of Proximal Development (1978), in which the learner is progressively challenged to take on more complex tasks with the support of the educator.
Now commonly used in all levels of education, scaffolding is characterized by a few core features:
The learner begins with what they know and can already do before moving to more challenging learning tasks.
Content, materials, resources, assessments, and teacher and peer support are appropriately sequenced to optimize learning. For example, more intensive support is provided early in the scaffold.
The learner develops increasing autonomy through practice, feedback, and the gradual fading of support.
The educator monitors student learning and adjusts levels of support as required. As students become more confident, the educator withdraws support over time to develop individual student mastery.
The scaffold is implemented across several weeks or even an entire semester to gather information on student learning, provide feedback, and adjust support along the way. Sufficient time is allocated to each stage in the scaffold to ensure students receive formative feedback they can act on.
The Process of Scaffolding
1. Diagnose students’ understanding and communicate expectations
Before students begin working on an assessment, it is crucial to determine what they already know, what misconceptions they may have, and what gaps in understanding need to be addressed. This diagnostic phase is the foundation of effective scaffolding, as it allows you to tailor your support to students’ actual needs rather than making assumptions about their readiness.
How to Diagnose Student Understanding
Ask diagnostic questions: Encourage students to share their prior knowledge and perspectives. For example, before assigning a research paper, ask: “What do you already know about writing a strong thesis statement?” “What challenges have you faced in structuring an argument in past assignments?”
Use formative assessment techniques: Have your students complete a short knowledge check before beginning a major assessment. Ask them to rate their confidence level on key concepts related to the assessment. Once students’ understanding has been diagnosed, it is equally important to clearly communicate expectations for the assessment. Students should know what they need to do, how their work will be evaluated, and what resources are available to support them
Communicating Expectations
Clarify the purpose: Help students understand why the assessment matters and how it connects to their overall learning goals. For example, instead of saying, “You need to write an essay,” frame it as: “This essay will help you practice constructing logical arguments, a skill essential for academic writing and debate.”
Provide clear rubrics and examples:Share a detailed rubric that outlines how the assessment will be graded and provide model responses or exemplars. Provide exemplar responses and analyze them with students to highlight strengths and areas for improvement.
Break down the assessment into manageable steps:Explain key elements of the task and discuss common mistakes students should avoid. Divide complex tasks into smaller, sequential steps with clear milestones. Example for a research project: “Selecting a topic → Forming a thesis → Gathering evidence → Drafting → Revising → Submitting.
2. Create shared understanding and scaffold key concepts
One of the main reasons students struggle with assessments is mostly not due to a lack of ability, but rather a lack of clarity—either about the content itself or about how they are expected to apply their knowledge in the assessment. Ensuring that students have a clear, shared understanding of the key concepts before they attempt an assessment task is key to the successful completion of the assessment task.
Encourage open discussions:Allow students to express their understanding of a concept before complex explanations. Ask questions like: “Can someone explain this concept in their own words?” “What are your initial thoughts on this topic?”
Use analogies and real-world examples:Relating abstract concepts to everyday experiences can help clarify meaning. Use concept maps, videos, diagrams, and live demonstrations to illustrate abstract ideas.
Invite students to articulate their questions: Rather than assuming students will ask when they don’t understand, create structured opportunities for them to express confusion. Many students hesitate to ask questions, fearing they might appear unprepared. Encourage structured opportunities for them to express confusion, like anonymous question boxes and think-pair-share discussions.
3. Provide contingent support
As students engage with the assessment, they will require differentiated levels of support based on their understanding. The support provided should be adaptive and responsive to students’ evolving understanding, gradually shifting responsibility to the learner as their competence grows. The goal is to provide just the right level of support to help students progress without making them overly dependent on assistance. Therefore, your support should be aligned with the student’s current level of understanding, ensuring that guidance is neither too simplistic nor too advanced. For example, if you realize, based on the diagnostic information, that a student is struggling or making specific errors, increase the level of support. This could include providing additional explanations, using different instructional strategies, offering hints, or breaking tasks into smaller steps. Provide guiding questions or cues to help students think through the problem. Use graphic organizers, worked examples, or step-by-step approaches to help students build their understanding.
4. Check student learning
Checking student learning is an essential part of scaffolding assessment, as it ensures that the instructional and assessment scaffolds provided have successfully supported students’ development. This process goes beyond diagnosing initial understanding—it helps you understand how students’ thinking has evolved through instructional interventions. Rather than assessing only final performance, checking learning focuses on students’ progress throughout the assessment process.
At this stage, you could use exit tickets to have students reflect on what they learned and what still confuses them about the concepts or assessment task. Providing self-assessment checklists can also help students assess their own work and track their progress. You can ask your students reflection questions like “What was the most challenging part of this assessment?” or “How did your approach change as you worked through it?” to encourage deeper thinking. Checking student learning ensures that your students are not just completing assessments but doing so successful
Examples: What does this look like in practice?
Let’s break down a few examples to show what scaffolding could look like. You can scaffold assessment tasks into stages whereby students receive feedback at each stage. The number of stages you break a complex assessment into will depend on the course outline expectations. That is, some stages are not necessary, drawing from the course outcomes. Staged assessments may include non-graded, low-graded, and mid-graded components.
Example 1 – Scaffolding towards a Group Project
Stage 1: Resource Gathering- You can scaffold Stage 1 by providing a template to search for information and the feedback sheet, which students could use as they work together in Stage 2. This may be a non-graded individual task to gather resources. You can provide feedback on the resources gathered.
Stage 2: Group Plan- This would be the first group task, and students again may be given a template to provide a structure for the task and also to support the initial group work by requiring a timeline, discussion of methods of communication, and allocation of tasks. This may be weighted at a low grade with feedback to groups on their plan.
Stage 3: Written Submission- This may be the written component of the project where students provide a proposal of their project. Students may be provided with a marking guide to indicate areas to focus on. This task may be weighted at low to mid-grade with feedback to groups on their proposals.
Stage 4: Oral presentation- This task could be supported with PowerPoint slides. At this stage, students may receive mid-weighted grades from faculty and feedback from both faculty and peers. A grading rubric could be used to help groups know what is required of them and to enable comparable marking.
The final stage of the assignment may be a personal reflection on the group work itself, learnings and areas that students still require support on, and the individual contributions of each group member. In addition, students could be asked for comments on the actual assignment and how it could be improved in the future. This component may be a low-weighted grade item.
Example 2 – Scaffolding towards a Poster Presentation
Stage 1: Reading Analysis Log with faculty feedback
Stage 2: Article Breakdown with faculty feedback
Stage 3: Brief Literature Review with faculty feedback
Stage 4: Poster Presentation with both faculty and peer feedback
Example 3 – Scaffolding towards a Final Paper
Stage 1: Proposal and topic identification with faculty feedback
Stage 2: Bibliography with faculty feedback
Stage 3: Full paper where students draw from feedback on the first two stages
Example 4 – Scaffolding towards a Midterm Test
Consider the following options for scaffolding in preparation for a midterm test or final exam:
1. Offer students practice questions at regular intervals in the weeks leading up to the assessment. Share feedback on practice question answers so students are on the right track.
2. Schedule time in class to discuss the practice questions to identify where they struggled/did well/got stuck to cultivate self-awareness as a learner, and to clarify misconceptions.
3. Clarify midterm exam expectations for students, such as explaining the number and type of questions, the time allocated to completing the exam, the learning outcome(s) of focus, and invite feedback from students during the midterm introduction.
Share this Teaching Tip
Monsurat Raji
Monsurat completed her Doctoral program in Education at the University of Ottawa, Canada, with a focus on Educational Assessment and Teaching Pedagogies. She has an M.Ed. (with thesis) from the University of Manitoba, Winnipeg; M.Sc. in Educational Research Methods, Assessment, and Evaluation from Liverpool Hope University, Liverpool, United Kingdom, and a Post-Graduate Diploma in Education (Educational Assessment & Evaluation) and Bachelor of Science degree in Chemistry from University of Ilorin, Nigeria. She recently completed a Graduate Certificate in University Teaching and Learning from the University of Ottawa, and has facilitated teaching, learning, and assessment workshops for graduate students, newly recruited faculty, instructors, and tenured faculty members. She brings her international education background and career experience derived from studying, teaching, and consulting in different education systems and levels to work at Conestoga’s Teaching and Learning Department.